
Installing your
balcony power plant
Congratulations to you! With the purchase of your Solarnative balcony power plant, you have become a part of the energy transition and are personally contributing to decarbonization. You will soon be producing your own electricity — independently, free of charge and green! But — first things first — your new plug-in solar system needs to be set up first. Don’t worry: it’s really easy! You can install the Solarnative components and do the wiring on your own; it is advisable to get a helper at your side to attach the solar modules. With the following step-by-step instructions, installing your balcony power plant is child’s play!
Preparation
1. Install the Solarnative App
Install the Solarnative app on your smartphone and set up your user account.
2. Check scope of delivery
Check that all Solarnative components have been correctly supplied:
- One PowerStick Balcony per PV module
- One IntelliGate Balcony including end cap
- One Connection cable per PV module (different lengths if necessary)
3. Other material and tools
Depending on the type of installation, mounting materials for the solar modules and the appropriate tools are required. To install the Solarnative PowerStick, all you need is an M8 screw and the appropriate open-end wrench and/or Allen key. Also have a small slotted screwdriver to hand in case you need to loosen a plug connection during installation.
Tip
For mounting the PowerStick Balcony, we recommend using an M8 screw with washer and a suitable self-locking flange nut with locking teeth.
Mounting the PowerStick Balcony
Option 1: Mounting on the module frame
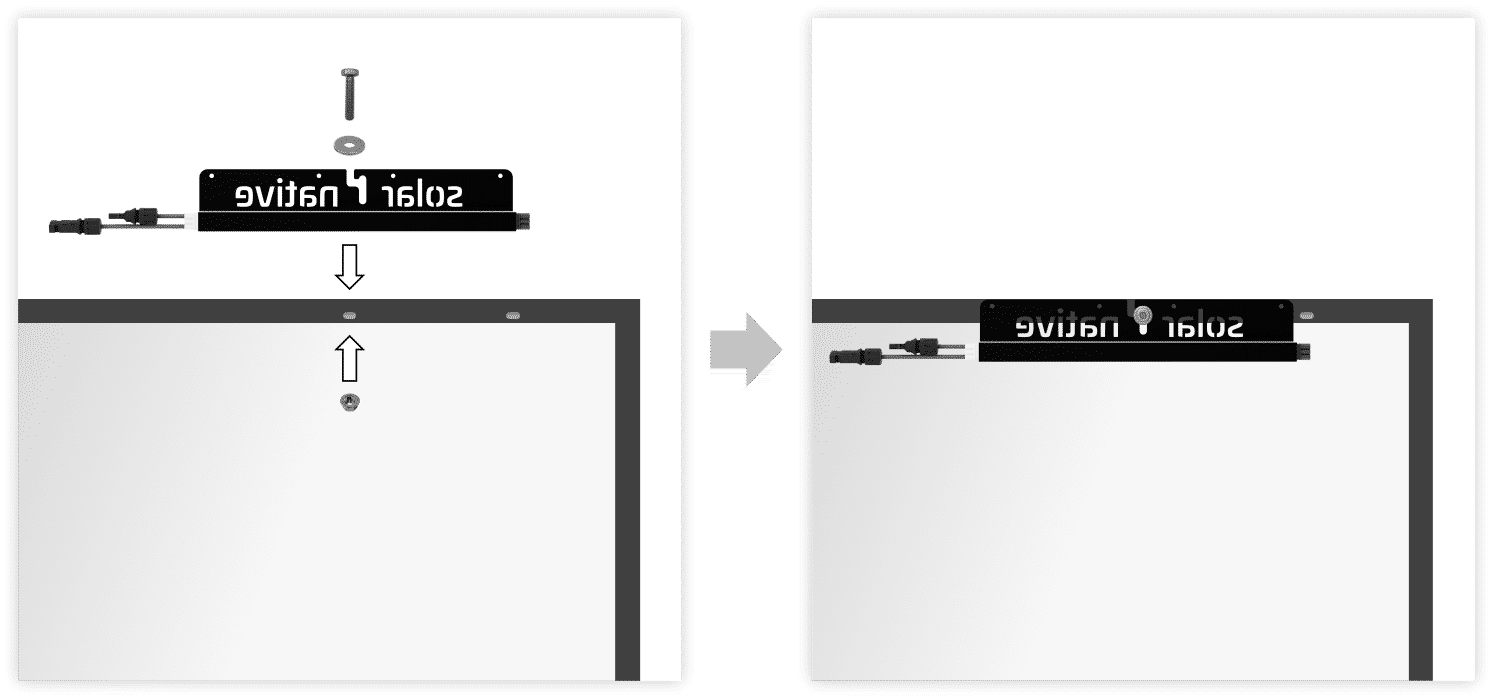
Due to its unique design and low weight, the PowerStick Balcony can be attached to the frame of the solar module. From a frame width of 32 mm, the housing body of the PowerStick Balcony can be installed facing the module (Solarnative lettering legible); for narrower frames, the housing body must be installed facing away from the module (Solarnative lettering mirror-inverted). To avoid damaging the module, it is always important that the inverter never touches the back of the module.
Attach the PowerStick Balcony to the module frame using an M8 screw with washer and a suitable flange nut. Use one of the existing frame holes and ensure that the holes required for mounting the module on the balcony or substructure remain free.
Option 2: Mounting on the substructure
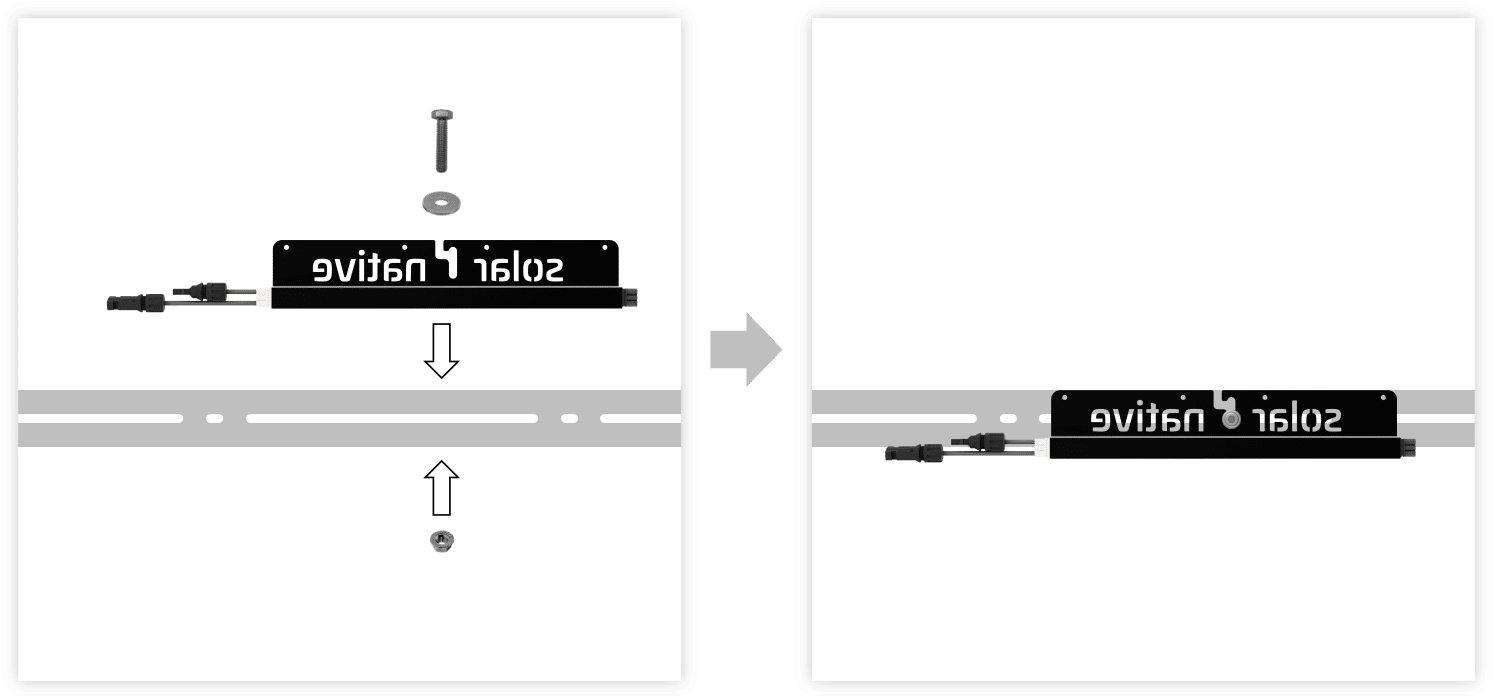
If you have purchased a substructure for mounting the solar module that provides a suitable location for attaching the inverter, you can attach the Solarnative PowerStick here using an M8 screw, a washer and the appropriate nut. To avoid damage, make sure that the inverter does not touch the back of the module when using this installation method.
Option 3: Mounting on the balcony railing
Alternatively, the PowerStick Balcony can be attached to the existing structural elements of the balcony, such as the railing. Depending on the material and condition, M8 screws and nuts, self-tapping screws or UV-resistant cable ties can be used. Make sure that the inverter cannot come loose on its own and that the device is protected from the sun and weather.
Connecting the PV modules
Connect the MC4 connectors of the PowerStick Balcony to the matching connectors of the solar module. The Solarnative PowerStick Balcony is compatible with the Stäubli MC4 and Stäubli MC4-Evo 2 module connectors. If you are unsure, check the data sheet for your solar module.
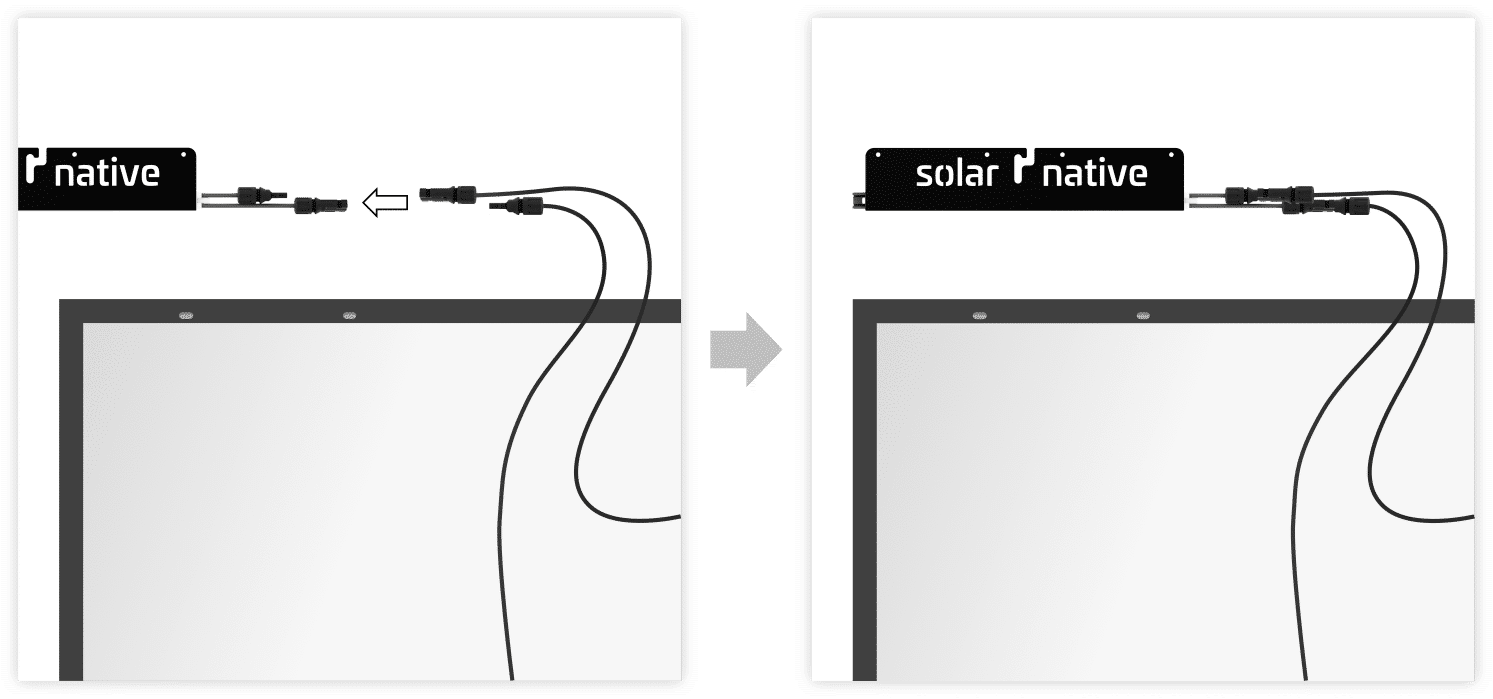
When attaching the PowerStick Balcony on the module frame oder on the substructure firmly bolted to the module this step should be carried out before attaching the module to the balcony.
If the inverter is installed on the balcony railing is still accessible after the solar module has been installed, it may make sense to connect the MC4 connectors later.
Note
The sequence of the installation steps is not decisive for the function of the devices, but depends on the practical circumstances of your individual installation situation.
Connection of the inverters
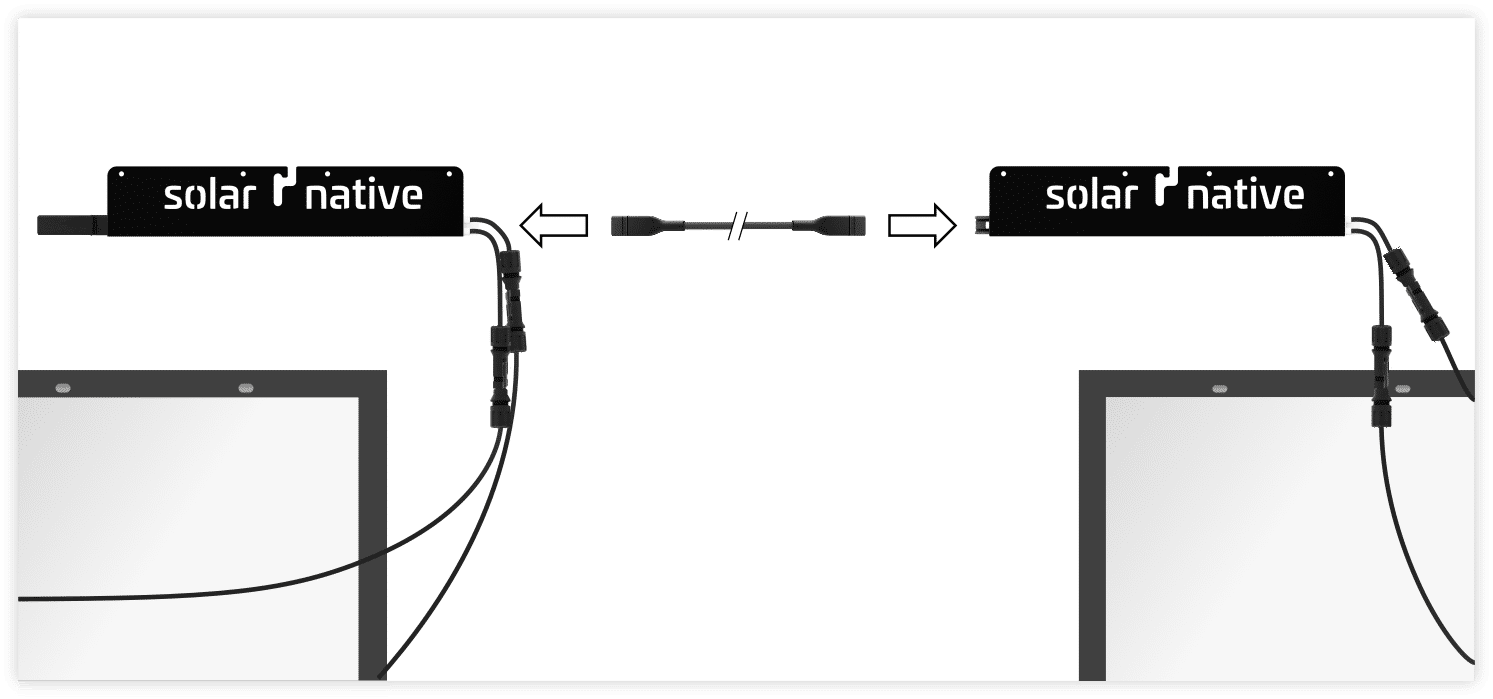
Connect two PowerStick Balcony units with a connecting cable of the appropriate length. Always listen for the clicking sound when snapping in the connectors.
This step is not necessary for systems with only one PowerStick Balcony.
Terminating the string
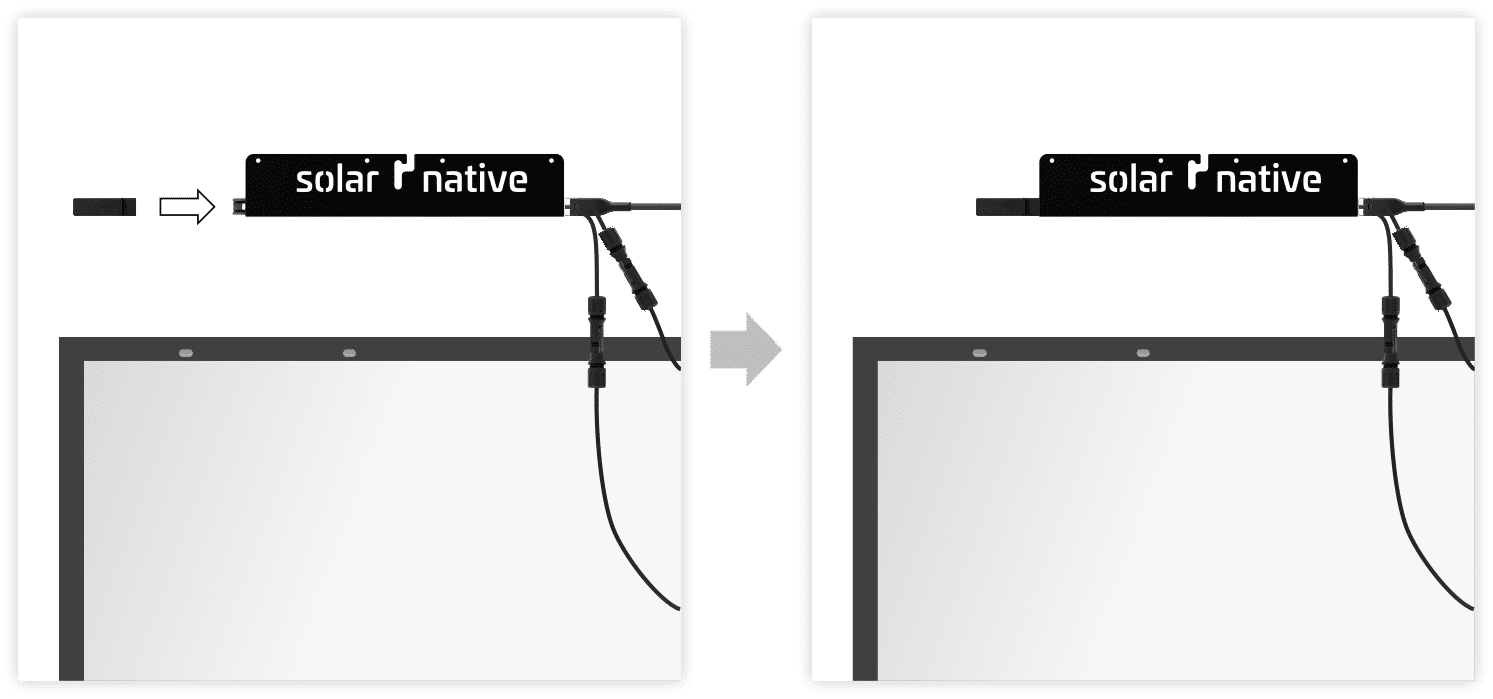
Close the last PowerStick Balcony with the Solarnative end cap. Listen for the clicking sound when the end cap clicks into place.
Note
The Solarnative end cap and connection cable are equally compatible with both sides of the inverter. You can decide which side you want to attach the connection cable to and which side you want to attach the end cap to, depending on your individual system design.
Connect IntelliGate Balcony
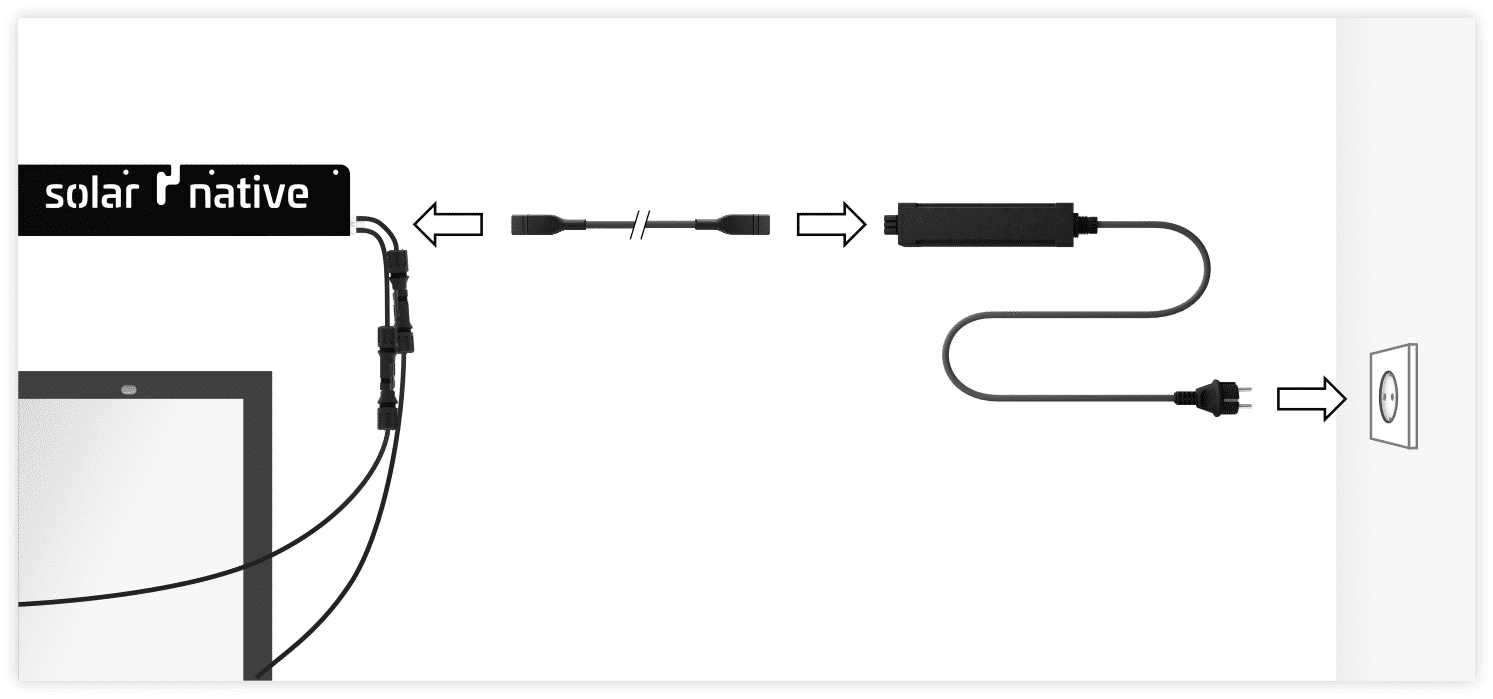
Connect the first PowerStick Balcony in the string to the IntelliGate Balcony using a connecting cable of a suitable length. Listen for the clicking sound when plugging in.
Check the LED on the PowerStick Balcony
Check the LED on the side with the bright-coloured connector for each PowerStick Balcony. The following operating states may be present:
- BLINKS (30s.): Normal operation
- BLINKS (1s.): No power feed. Waiting for grid connection. Mains signal is missing or outside the normal range.
- ON: Inverter fault
- OFF: Inverter off (night, snow, dirt) or without function (defective)
If one of the inverters is without function for a longer period of time (LED does not light up), please contact our customer service.
Fastening the cables
Use cable ties to secure loose cable parts or excess cable lengths to the balcony’s substructure or structural elements. Lay and fix the connection cables in such a way that the connectors are not subjected to any tensile or bending loads.
Setting up the system
If you have not yet downloaded the Solarnative app and set up your user account, please do so now. You can then put your balcony power plant into operation. To do this, scan the QR code on the IntelliGate Balcony and follow the further steps to set up the system in the app.
Note
Observe the safety instructions in the Quick Installation Guide which was supplied with the IntelliGate Balcony.
Take the balcony power plant out of operation
If you ever need to take your Solarnative balcony power station out of operation — for example when moving house or renovating — always disconnect the Schuko plug on the IntelliGate Balcony from the socket first. The system is de-energized after 0.2 seconds. If necessary, you can then disconnect all other plug connections.
Do you need support?
You can find useful information and personal assistance in our service area.
